RV-LevelMate installation and use
Congratulations on your purchase of the Car Leveler, your ultimate solution for achieving perfect leveling for your vehicle. This user guide will walk you through the step-by-step process of installing and using the leveler effectively. Now let’s proceed with the step-by-step process:
- Measuring Wheel Distances and Diameter: Using a measuring tape or a suitable tool, carefully measure the distance between the front and rear wheels of your vehicle. Additionally, measure the distance between each front wheel. Finally, note down the diameter of your wheels. These measurements will be used to achieve precise leveling with the Car Leveler.
- Measuring Your Leveler Tool: Take your leveler tool and measure its dimensions. Note down the length, width, and height of the leveler tool. These measurements are crucial to ensure compatibility and accurate reproduction within the RV-LevelMate application.
- Park your Vehicle on an Uneven Surface: Find a suitable location with an uneven surface to park your vehicle. This will allow you to accurately level your car using the Car Leveler. Open the RV-LevelMate Application on Your Mobile Phone. Launch the RV-LevelMate application on your mobile phone. Ensure you have downloaded and installed the latest version of the application from your device’s app store.
- Place Your Phone on a Flat Surface: Find a flat and stable surface nearby and place your mobile phone on it. Ensure the phone is positioned securely to maintain stability during the leveling process.
- Locking the Screen: To fix the height lift for each wheel, you need to lock the current screen. On the leveler control panel, locate the unlocked padlock icon. Click on it to lock the screen and ensure a stable lift.
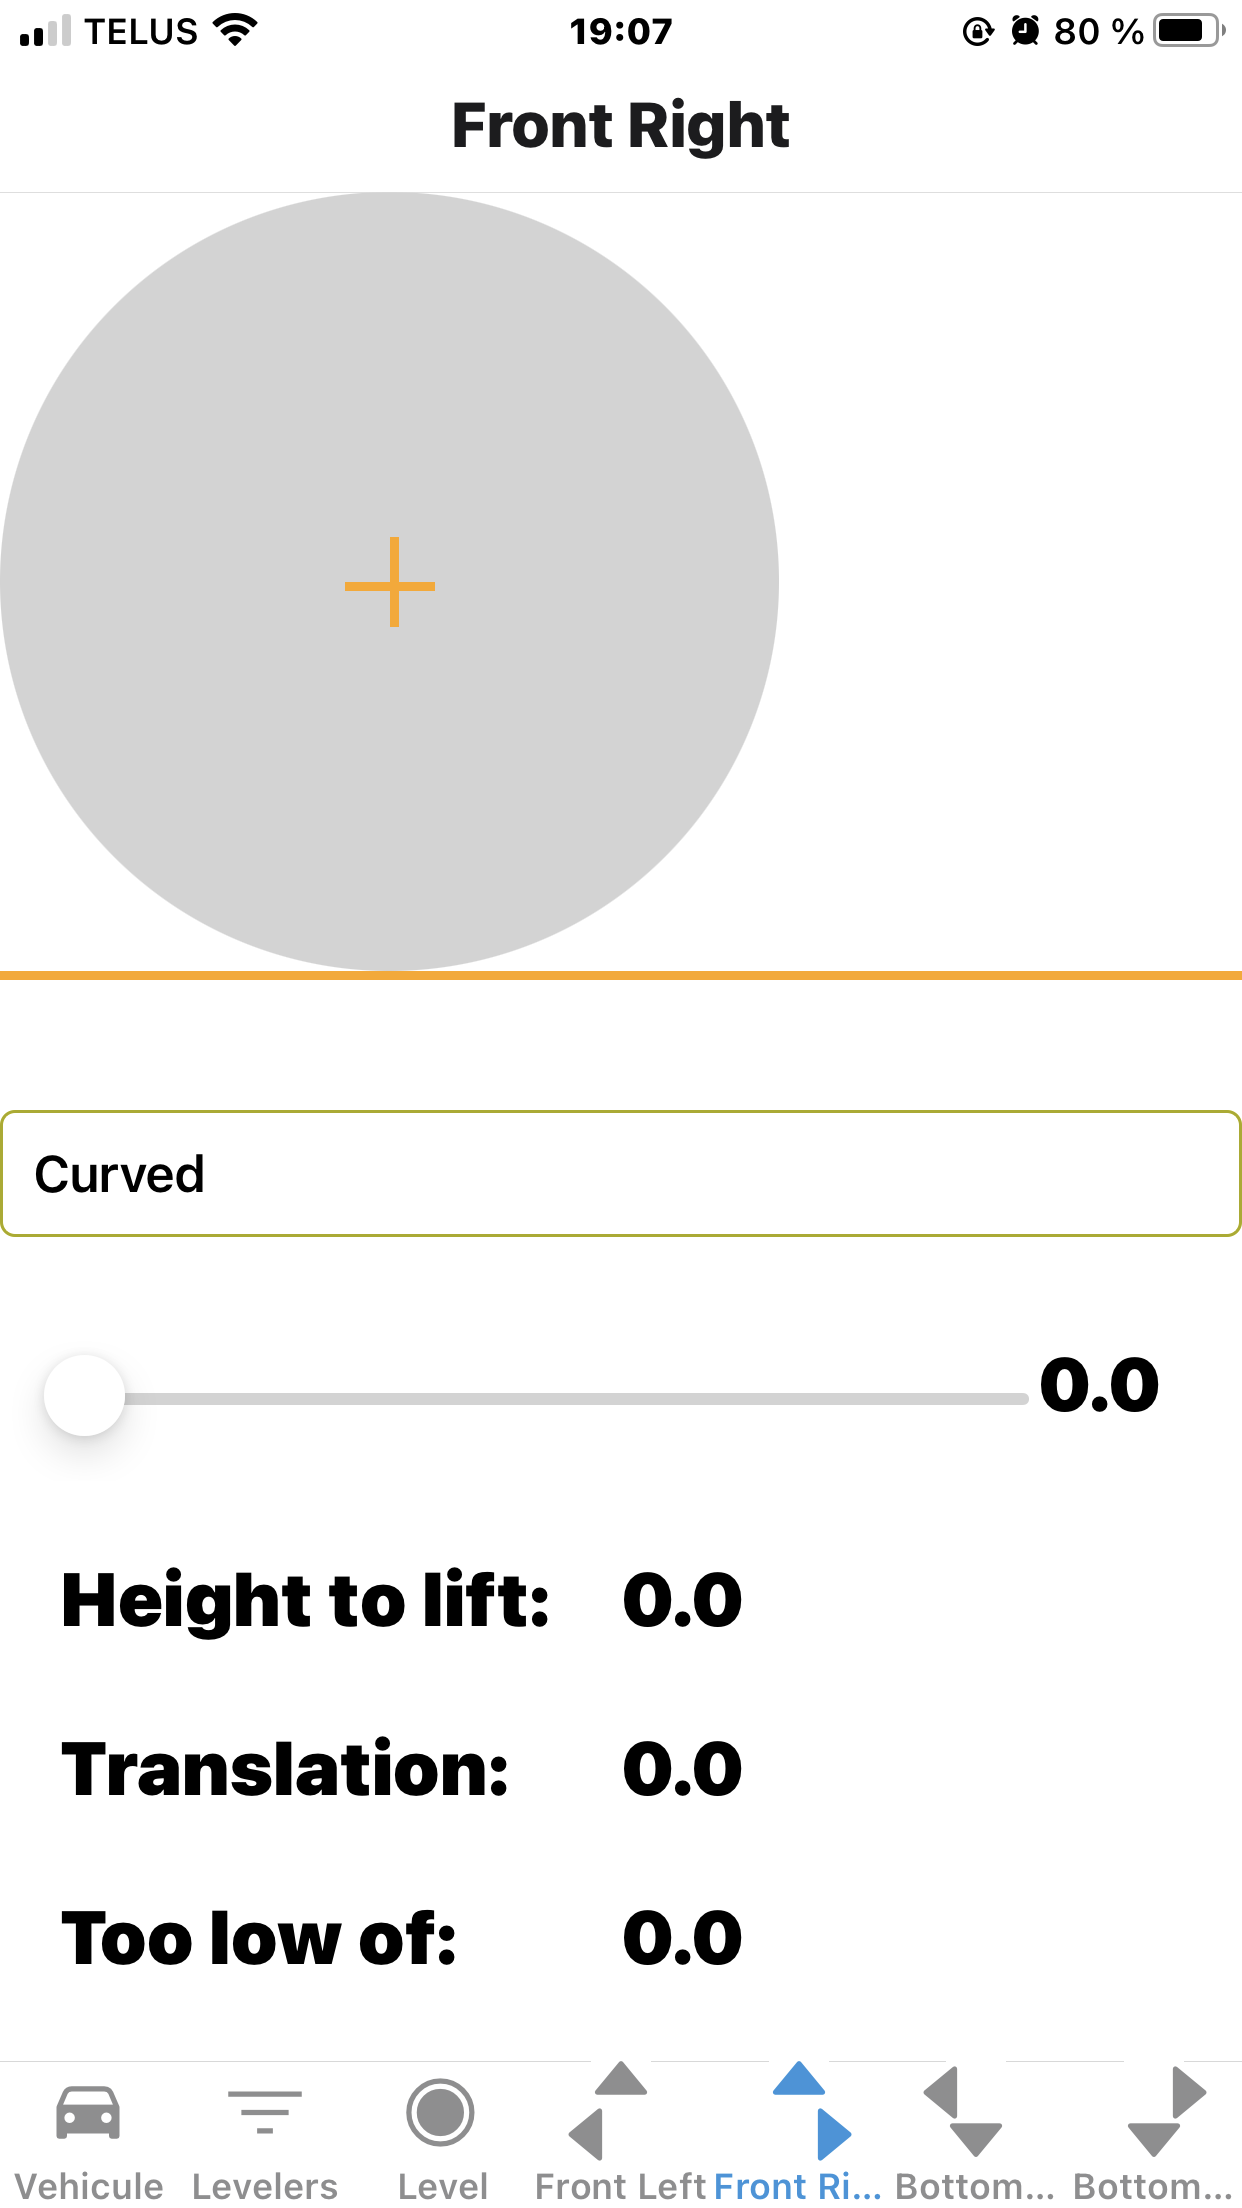
- Navigating to Wheel Screens: Once the screen is locked, you can navigate to the screen of each wheel. Use the intuitive interface to select the desired wheel screen. This will give you a visual representation of the leveler positioning for that specific wheel.
- Assessing Leveler Positioning: On the wheel screen, carefully observe the leveler positioning and assess if any adjustments are required.
- Installing the Leveler: Using the instructions provided, physically install the leveler for each wheel. Follow the recommended positioning and make necessary adjustments as needed. Ensure the leveler is properly aligned with the wheel to achieve accurate leveling. Repeat this process for all wheels.
- Achieving Perfect Leveling: With the leveler installed for all wheels, it’s time to achieve perfect leveling. Start your vehicle and drive it forward slowly. Observe the leveling process you mobile phone by unlocking it and ensure that the car is adequately leveled in just one attempt. Small adjustments may be necessary if leveling is not optimal.
Note: It’s important to exercise caution and follow safety guidelines during the leveling process. Avoid sudden acceleration or braking to ensure a smooth and accurate leveling experience.
Congratulations! You have successfully utilized the RV-LevelMate application to achieve perfect leveling for your vehicle. Enjoy a smoother and more comfortable vacation experience as you explore new destinations with a level and stable vehicle.
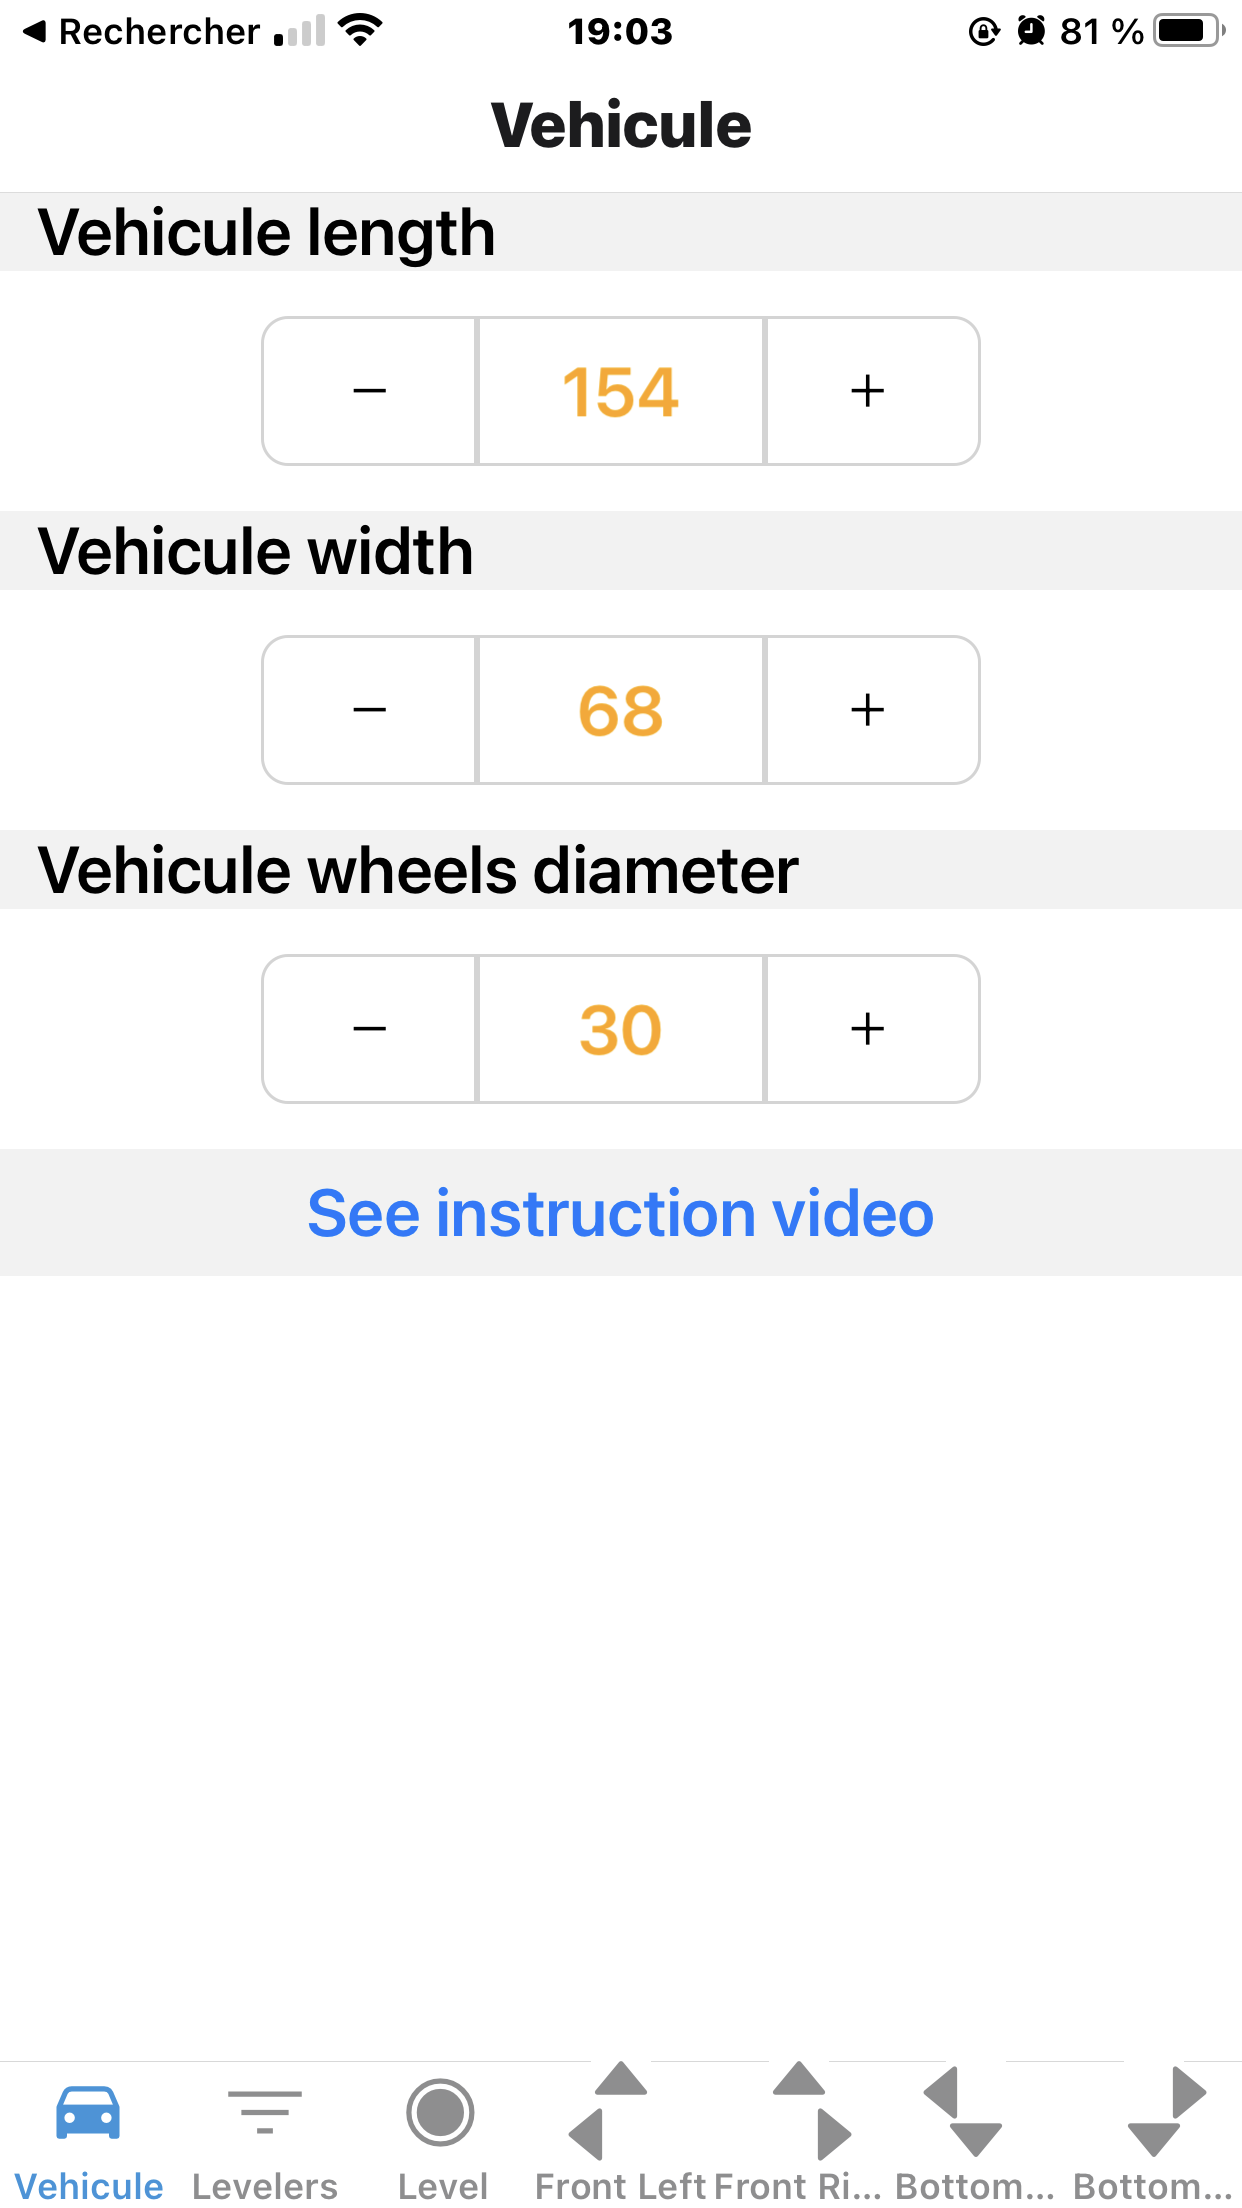
Configure Vehicule information
Setting your vehicle with RV-LevelMate is quick and effortless. Simply enter your RV’s length, width, and wheel diameter into the device, and let it do the rest. RV-LevelMate will automatically calculate the precise angle and direction needed for leveling, allowing you to park your vehicle with confidence and ease.
What’s more, RV-LevelMate is incredibly accurate and reliable. Mobile phone advanced sensor technology ensures that you achieve the perfect level every time, so you can enjoy a comfortable and stable living space wherever you go.
Say goodbye to the frustration and inconvenience of manual leveling, and upgrade to RV-LevelMate today! With its fast and easy setup, you’ll be on the road and enjoying your RV adventures in no time.
The application is designed to be agnostic to any specific measurement unit, allowing you to choose the unit that best suits your preferences and requirements. While the application does not impose a specific unit, it is common to use inches, millimeters, or centimeters for measuring purposes.
You can input your measurements in the preferred unit within the application, and it will accurately interpret and display the leveler positioning accordingly. Whether you prefer working with inches for a more familiar measurement system or opt for millimeters or centimeters for greater precision, the application can accommodate your choice.
It’s important to ensure consistency throughout your measurements within the application. For example, if you choose to work with inches, ensure that all your measurements, including wheel distances and leveler adjustments, are entered in inches for accurate results.
By remaining agnostic to any specific measurement unit, the application provides flexibility and convenience, allowing you to work with the unit of measurement that you are most comfortable with and that best aligns with your specific needs.
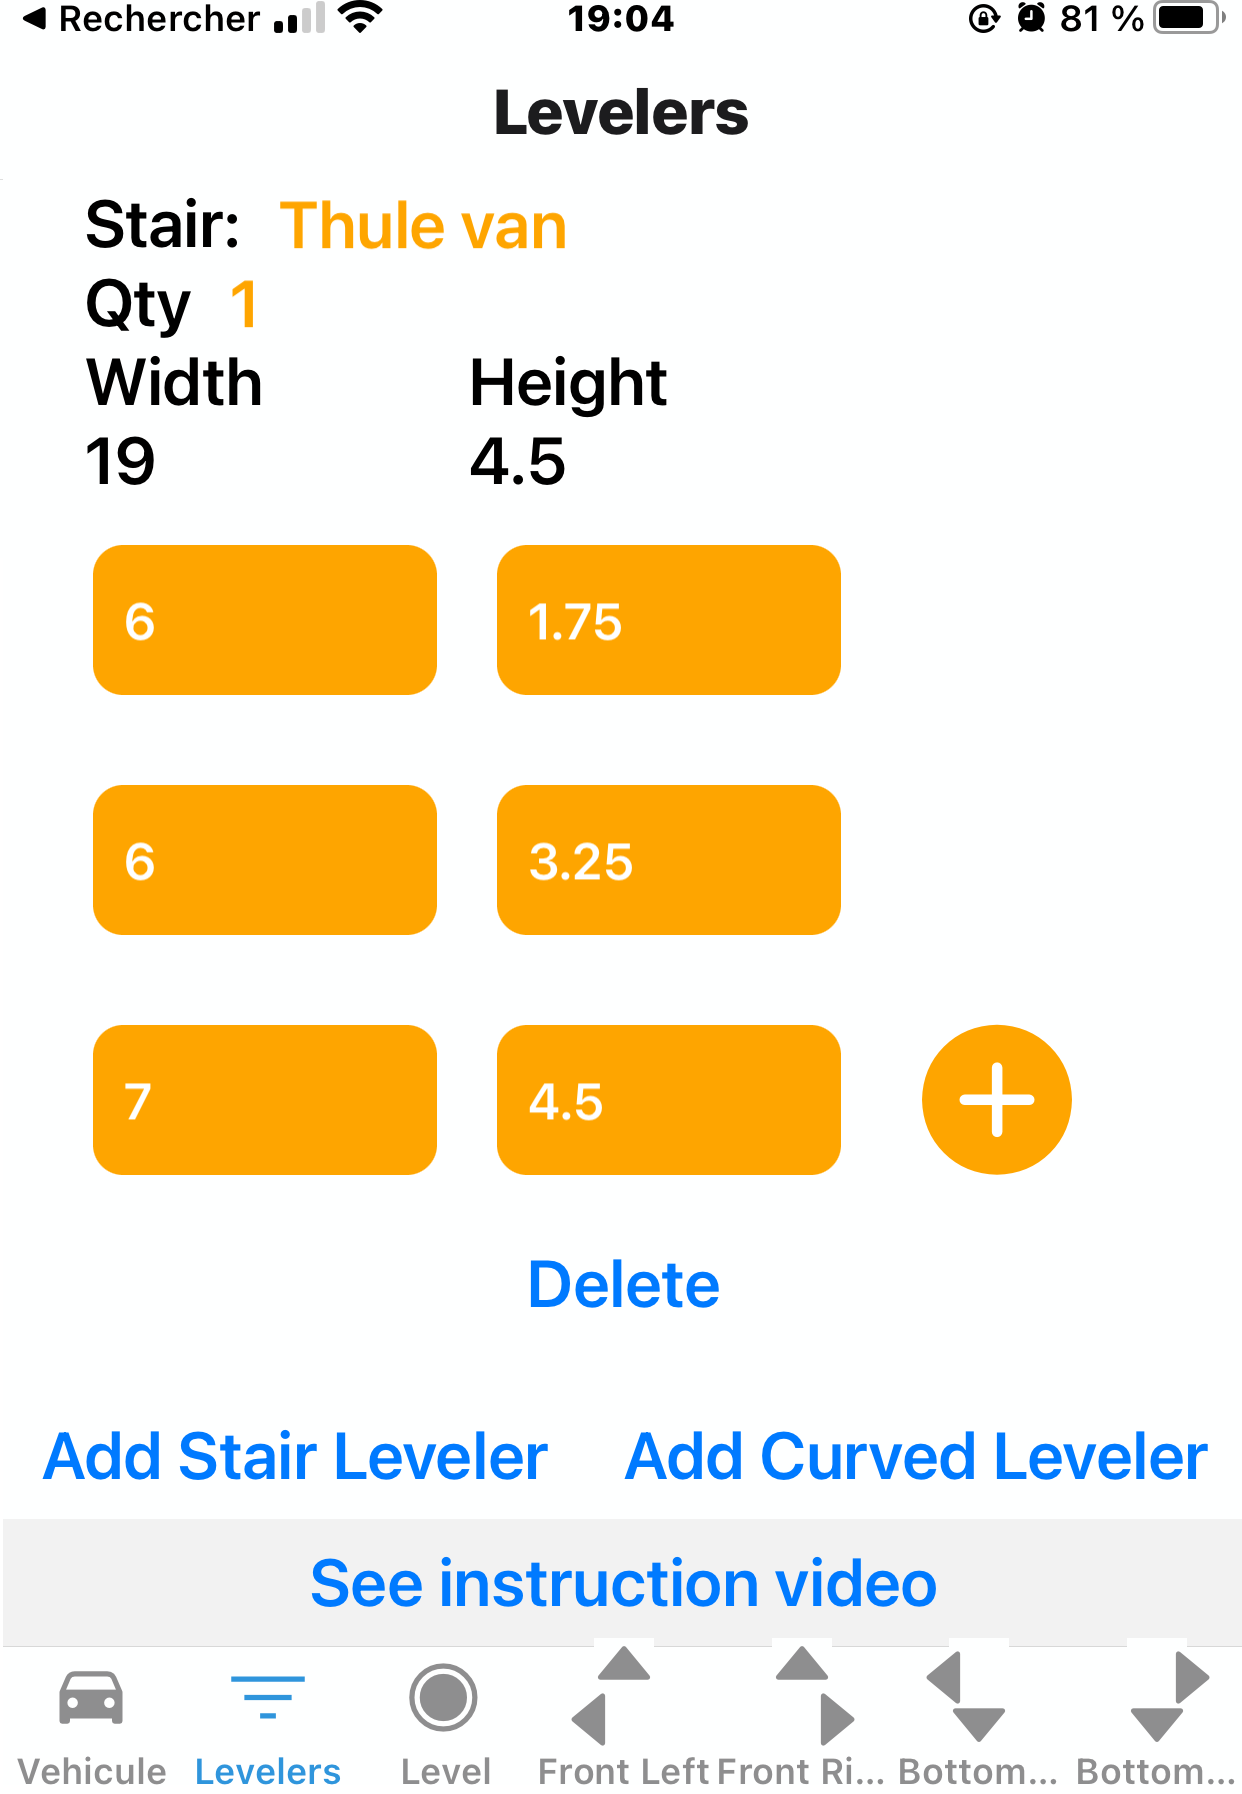
create Leveler
The RV-LevelMate application supports different types of levelers to cater to various needs. The following are the supported leveler options:
- Step Leveler: The step leveler is designed to increase the vehicle’s height in a stepped manner. It provides incremental adjustments, allowing you to raise the vehicle gradually until the desired level is achieved. This type of leveler is ideal for situations where precise and controlled height adjustments are required.
- Curve Leveler: The curve leveler provides a linear height adjustment, smoothly transitioning the vehicle to the desired level. It offers a continuous and gradual change in height, ensuring a seamless leveling experience. This type of leveler is suitable for achieving a consistent and balanced position for your vehicle.
The RV-LevelMate application supports both step and curve levelers, giving you flexibility in choosing the appropriate leveler based on your preferences and requirements.
For detailed instructions on using each type of leveler within the application and for any further assistance, please refer to the user manual or contact our customer support team.
Stair leveler setting

Curved leveler setting


Look at how I got these X and Y values for my curved leveler
Level RV
To fix the height lift for each wheel, you need to lock the current screen. On the leveler control panel, locate the unlocked padlock icon. Click on it to lock the screen and ensure a stable lift.

In the level screen, the automatic assignment of the leveler is performed each time you click on the padlock icon. This feature ensures convenient and efficient leveling of your vehicle. However, if you prefer to manually modify the leveler selection, you have the option to do so.
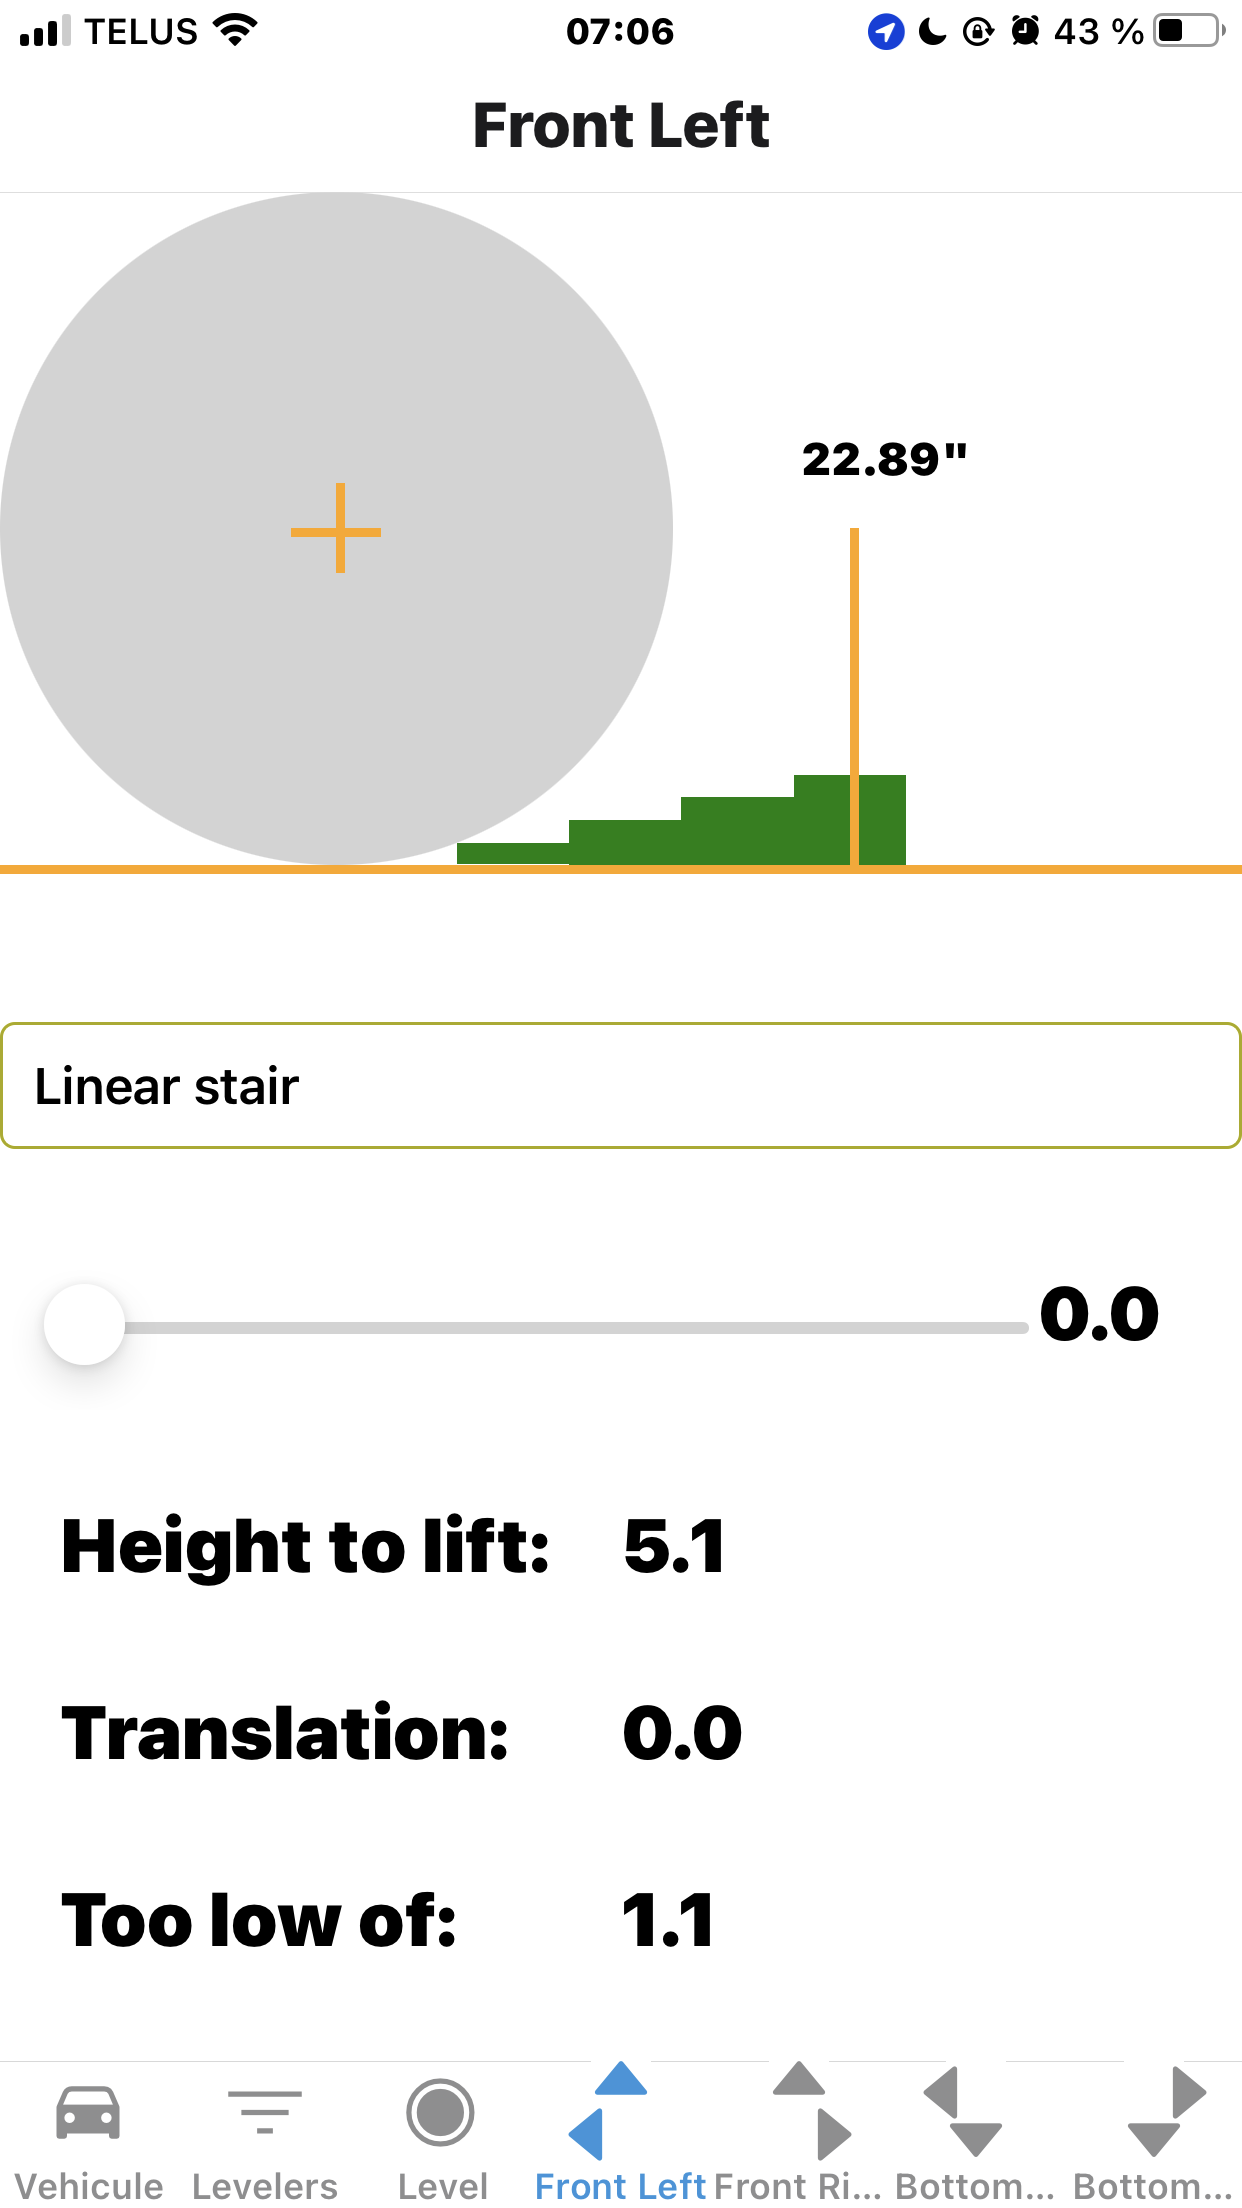
Moving the slider to the right will increase the lift height. Moving the slider to the left will decrease the lift height. Repeat this process for all wheels. Adding a spacer under the leveler will increase the lift height. The spacer can be a piece of wood, a leveling block, or any other suitable material. The spacer should be placed under the leveler and aligned with the wheel. Repeat this process for all wheels.
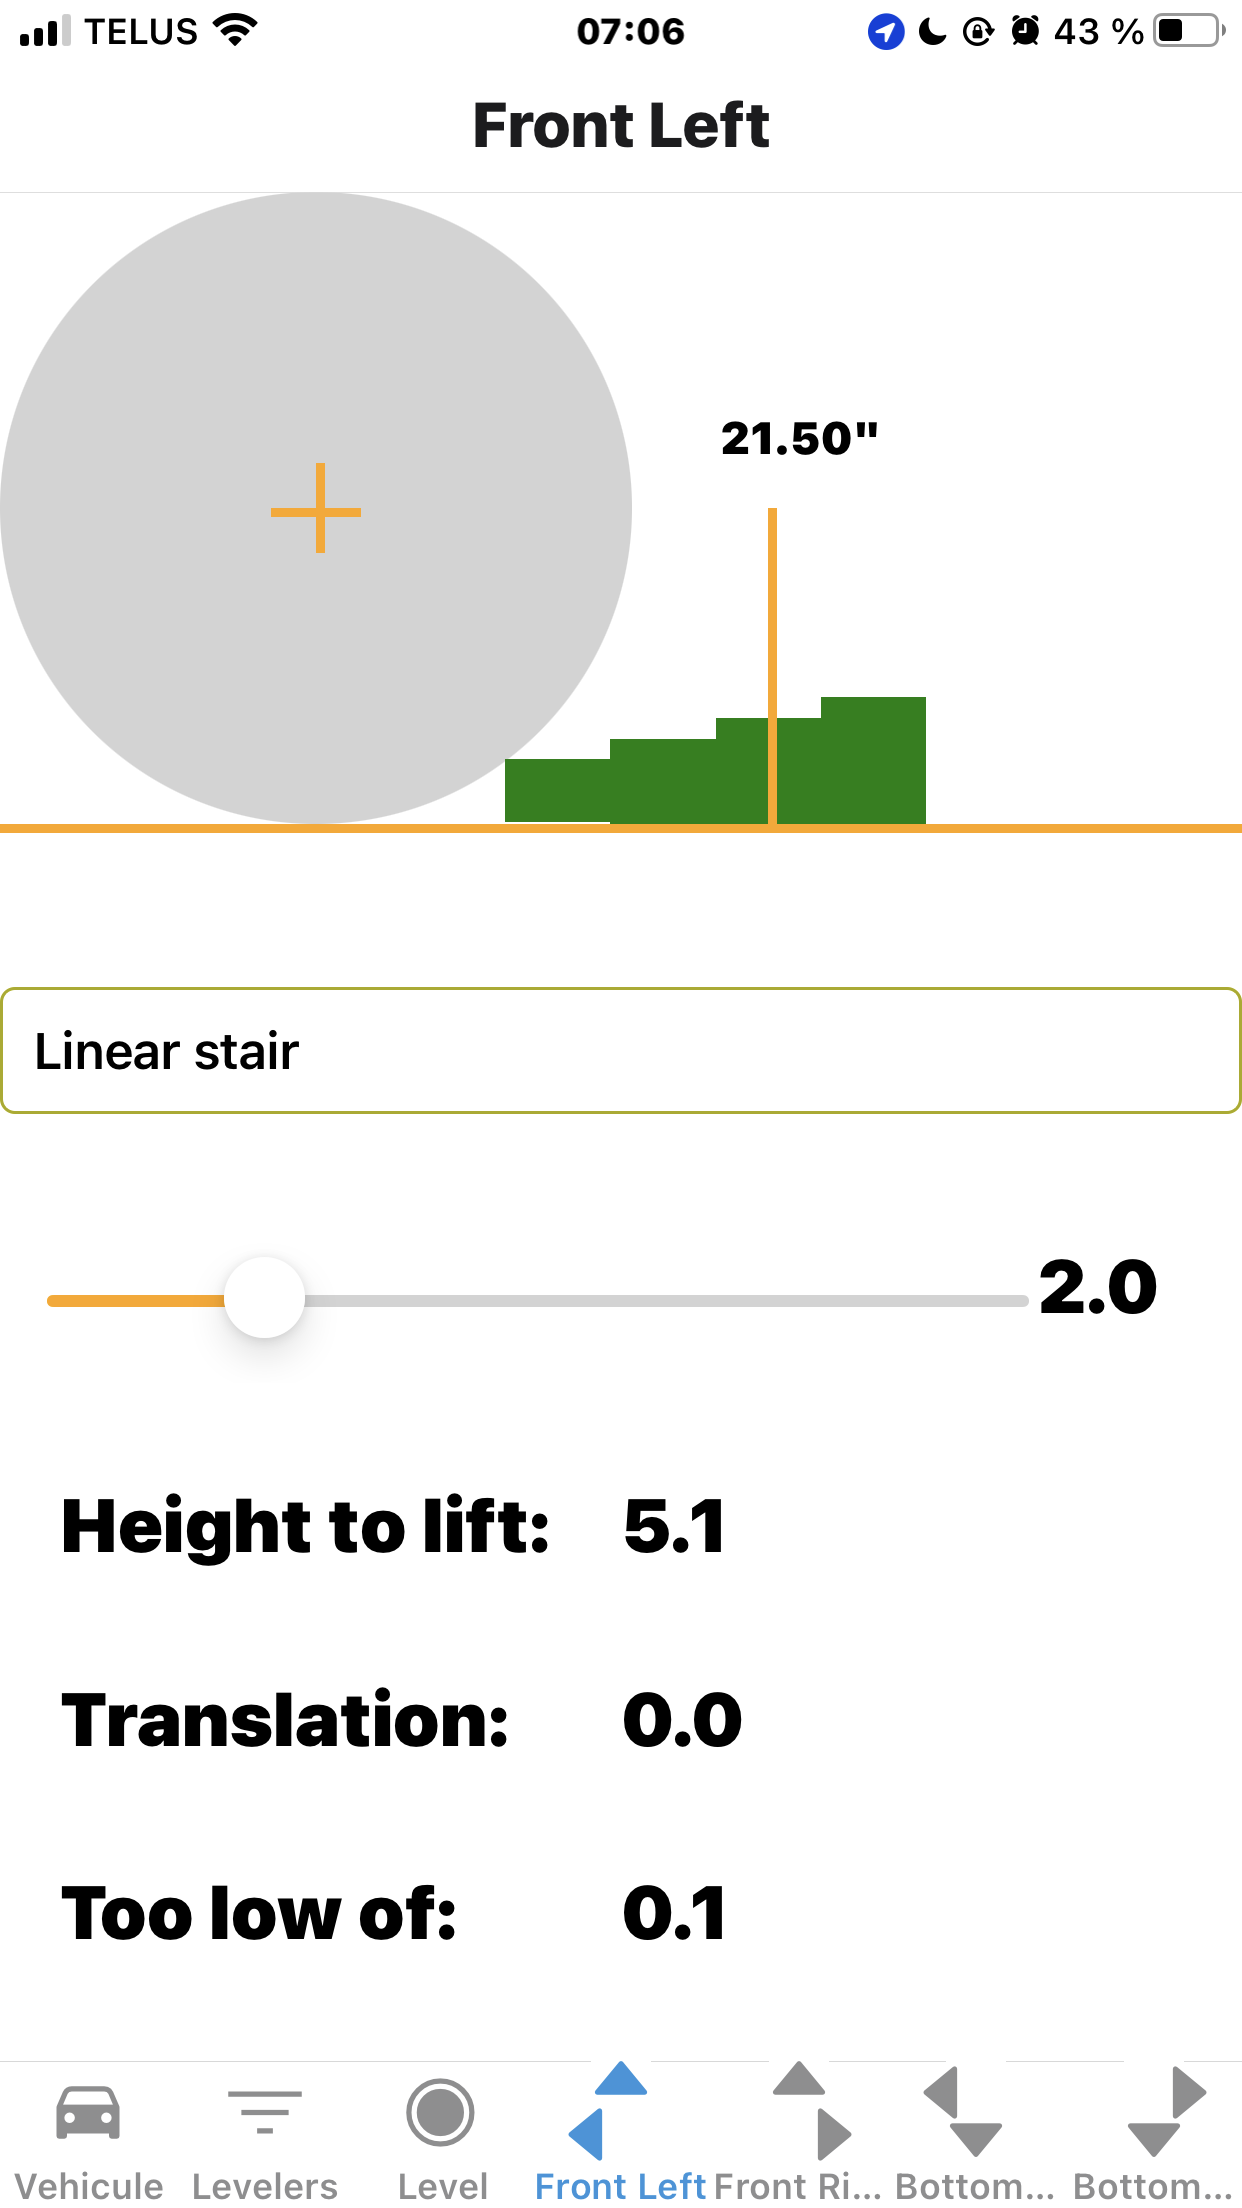
Continue tu adjust the spacer
When using the Car Leveler, you will notice that the spacer increases the height of the leveler and moves it away from the wheel. This adjustment affects the translation value, which indicates the distance between the wheel and the leveler. Follow these steps for correct positioning:
- Placing the Leveler: Ensure the leveler is placed directly across the wheel that requires adjustment. Position it in a way that the leveler is aligned with the wheel and the spacer is correctly installed, increasing the height as needed.
- Measuring with a Tape: Take a measuring tape and place one end on the side of the leveler, near the wheel. Then, carefully move the leveler until you reach the specific value indicated in the translation value. This ensures the desired distance between the wheel and the leveler is achieved.
- Proper Leveler Positioning: By following the measurement indicated in the translation value, your leveler will now be properly positioned. This step is crucial to ensure accurate leveling of the wheel.
- Observing the Vertical Line: After positioning the leveler for each wheel, observe the vertical line displayed on the screen. You will notice that these lines indicate the same distance from the center of the wheel to the final position on each wheel.
- Utilizing the Intelligent Application: This intelligent feature of the application assists you in achieving accurate leveling in just one attempt. By following the specific positioning and translation values, the application ensures that the leveling process is performed correctly and efficiently.
With these steps, you can easily position the leveler correctly using the translation value and observe the vertical lines to ensure consistent and accurate leveling across all wheels.
Leveled wheel
During the leveling process, you may encounter a situation where a specific wheel does not require any adjustments. This is indicated when you observe that there is no need to make any changes to the position or height of the wheel. Here’s what you need to know:
- Identifying an Unadjusted Wheel: As you navigate through the wheel screens on the Car Leveler, you may come across a wheel where no adjustment is necessary. This can be determined by observing that the wheel is already at an optimal level or aligned correctly without requiring any modifications.
- No Need for Leveling Adjustment: If you notice that a particular wheel does not require any adjustments, it means that it is already appropriately leveled. This could be due to the nature of your vehicle or the specific terrain on which it is parked. In such cases, it is not necessary to perform any leveling actions on that particular wheel.
- Focus on Other Wheels: When encountering a wheel that does not require adjustment, you can proceed to the next wheel screen and focus your attention on the wheels that do need leveling. This will ensure that you achieve the desired level and stability for those wheels while maintaining the already well-aligned position of the unadjusted wheel. Remember, it is common for at least one wheel on your vehicle not to require any leveling. This is perfectly normal and indicates that your vehicle is already balanced in terms of height and position for that specific wheel.
Thank you for reading this user guide. By following the instructions provided, you should now be able to efficiently use the RV-LevelMate application and achieve a balanced life.
RV-LevelMate in action
Vehicule measurement
Measure leveler


Leveling in action
Using spacer
Translate levelers
Others
RV-LevelMate, A balanced app for a balanced RV life